Ink Again
A little while ago, I tried out an Android eInk tablet. That one didn’t quite work out, and I returned it, but I still had the feeling that something along those lines would be useful. As I ruminated on it, I realised that the need I want to cover was very specific: reading. I’m not looking for handwritten notes1, or yet another way to read my email or browse the web. I want something to replace both my Kindle Paperwhite, for books, and my iPad Mini, for Readwise Reader (which I’ll refer to as “Reader” for brevity).
Both devices are getting on a bit, but are far from dead — they still have usable batteries, and work pretty much as they did when they were new. However, the Kindle is tied to Amazon’s ecosystem, and can’t be used with Reader, which rules it (or a newer version) out as a one-stop reading device. How about the iPad? It can access both Reader and the Kindle app (and Libby and BorrowBox and…). However, its glossy, backlit screen is not ideal for reading in the evening, and all but unusable outdoors. OLED might be an improvement, as it is on the phone and the watch, but as yet that hasn’t made it to the Mini. Moreover, the Mini isn’t all that mini — it’s noticeably bigger and heavier than the Kindle, and the metal-and-glass construction makes it feel less like something you just toss into a bag.
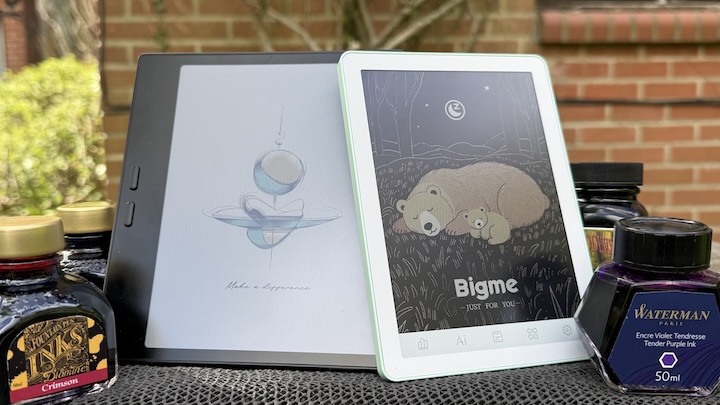
All of that steered me in the direction of another Android eInk device, but an eReader rather than a more general purpose tablet. After lurking on r/eink and r/readwise, I decided to get myself an Onyx Boox Go Color 7 (Gen II) (on the left in the photo at the top). This is in some ways the little brother of the Note Air 3 I tried in 2024, but with a few important differences. Firstly, it’s smaller and lighter (but more on that below), and has a plastic rather than metal construction. I consider the latter a plus for my particular use case, as it makes the device both more comfortable to hold for long sessions, and I have less instinct to treat it super-gently (the iPad Mini is pretty robust, but I feel like it needs coddling).
Another difference is, as the name suggests, colour. The Go Color 7 has a 7” Kaleido 3 display2, in contrast to the monochrome eInk of the Note Air (and Paperwhite). I wasn’t particularly looking for colour for this device, but the black and white version of the Go seems harder to come by, so I decided to give it a go. To be honest, it’s a bit of a mixed blessing.
Kaleido adds colour by means of an overlay, which can reduce the clarity even for black and white. I didn’t find this a problem in practice, but I did notice that the display was a little darker and lower contrast overall. However, it’s still more than readable enough both with ambient light and when using the front light. The colour itself doesn’t really add much when reading prose ebooks, but but turns out to be a nice enhancement for articles and the UI, so overall I think it’s a win.
Software-wise, both the Reader and Kindle apps (installed from the Play Store exactly as you would on an Android phone or tablet) work well, better than I recall them doing on the Note Air 3. This might be due to a faster processor, improved eInk technology, software updates, or a combination of all three. In any case, it’s no longer a sticking point for me.
One minor speed bump was security. The Go doesn’t have a fingerprint reader, and entering a passcode every time I pick the device up quickly became tiresome. For now, I’ve decided that the right trade-off is to run without a passcode, but to keep the data on the device to a bare minimum. I’m not concerned about anyone reading my Kindle books, I don’t put anything particularly sensitive in Reader, and I make sure any purchases need a password, so the impact of someone else getting access to the device is minimal. As a nice side effect, it avoids feature creep on what is intended to be a focussed device, and mitigates any privacy concern around Boox themselves3.
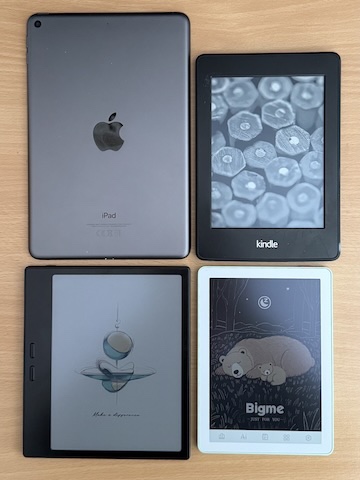
After using the Boox for a week or two, I was pretty happy with it, aside from one niggle: the physical size. As you can see in the , it’s about the same height as the Kindle, but the width is closer to that of the iPad, giving it a more-or-less square shape. The reason for this is the wide bar on the side, containing two physical buttons for page turning4. This is pretty ergonomic when reading, but makes the device a bit cumbersome when you’re not. Unlike the Kindle, it won’t fit into a the back pocket of jeans5, and is a tight squeeze even in a jacket. This is a pretty minor inconvenience, but an inconvenience nonetheless.
This lead me to look again at the options, and I came across the Bigme B6 (pictured on the right at the top of the post, and bottom right in the size comparison). Bigme seem to be a smaller, more recent entrant into the niche that Boox, but they’ve been growing in prominence for a while, and seem to offer some strong alternatives. I ordered a B6 to try out in parallel, with the intention of returning or reselling whichever I didn’t want to keep.
The initial impressions were very good; while still plastic rather than metal, it feels solid in the hand, and everything seems well put together. I went for the Jade Green version, which makes a pleasant change from utilitarian black and grey. The squared-off profile make it seem slightly thicker than the Boox, but not massively so, and make it easier to hold by the edges. Most importantly, the size of the device accomplishes the aim of solving my pocket problem.
The software experience was more of a mixed bag. Broadly speaking, Bigme’s platform is similar to Boox’s, being a custom shell on top of Android and the Google Play Store. Kindle and Reader both worked well; no physical page turning buttons, but gesture controls do the job fine. The device felt a little more sluggish than the Boox, but not disastrously so, and certainly not enough to put me off out of the box.
One thing that did put me off was the strip of fixed controls along the bottom of the screen. These aren’t part of the eInk display, but are simply printed on. Not only can they not be visually changed, the software didn’t offer a way to customise the functionality. The best you can do is disable the Bigme store and AI (which I did immediately), but that still left three functions I don’t use often if at all, and a honking great eyesore glommed on to every page.
This is compounded by the size of the screen — 6”, like my old Paperwhite, rather than 7” like the Boox. I found that fine for reading prose, but a bit cramped for articles, particularly those with diagrams. The colour reproduction seemed significantly worse as well, not in terms of lack of vibrancy but rather consistency across the screen. This is particularly noticeable if you ever find yourself on a web page with a flat, mid-level background colour, like Daring Fireball. This looks fine on the Boox, but has very pronounced banding and fringing on the Bigme. This alone wouldn’t be a major issue, but was another in a growing pile of minor irritations that tipped the scales against the B6.
I ended up returning it, and sticking with the Boox. The convenience of a slightly smaller device didn’t outweigh the utility and functionality of the slightly larger one. I think my ideal form factor is probably somewhere between the two — the screen of the Boox, but without the side buttons6 — but for now I’m very happy with it. Especially as the weather improves, I’m appreciating having a lightweight and distraction-free device that lets me read anywhere. For me, at least, this is a niche that I’m glad is being served.
-
I’ve lately found myself getting more into real-life fountain pens and notebooks, but that’s another story. [back]
-
The same display is used in quite a few colour eReaders, including the Kindle Colorsoft [back]
-
Boox are based in the People’s Republic of China, meaning I don’t have the same data protection expectations that I do of a UK or EU company, or even a US one. I’ve not seen anything particularly worrying about the company specifically, but the wider context makes me cautious. [back]
-
These are exposed to Android as volume buttons, but both Kindle and Reader has a “turn page with volume buttons” option. [back]
-
I realise that, as a man, it’s a privilege that I have pockets big enough to fit things in in the first place. [back]
-
Hardware-wise, the latest Kindle Paperwhite and Colorsoft aren’t too far from this, but they of course fall down in terms of software flexibility. [back]